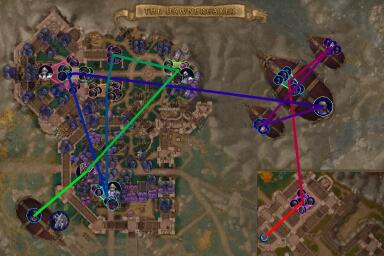
Season 3 next week
Xal'atath's Bargain: Voidbound
Fortified
Tyrannical
Xal'atath's Guile
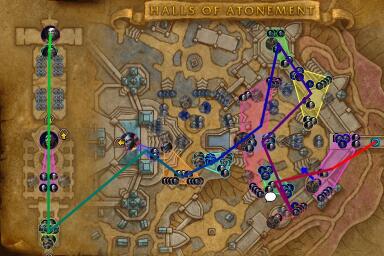
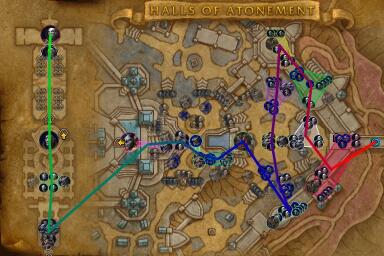
This is a PUG-friendly route suitable for players at a variety of keystone levels, but feel free to make some tweaks once you're ready to start practicing skips or bigger pulls! Links to video guides on the bosses are included within the pull descriptions/notes. Learn more at raider.io/weekly-routes.
100%
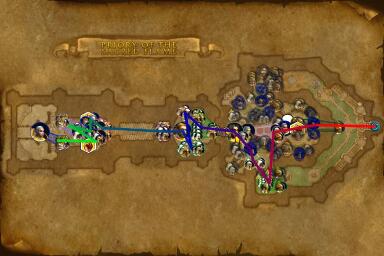
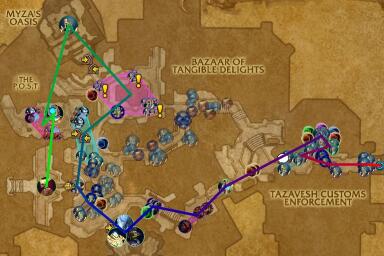
This is a PUG-friendly route, suitable for players at a variety of keystone levels. Links to video guides on the bosses are included within the pull descriptions/notes. Learn more at raider.io/weekly-routes.
100%
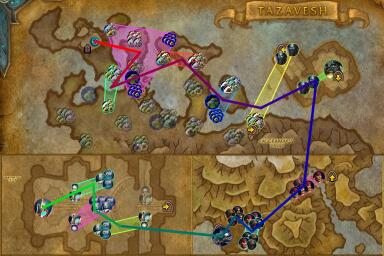
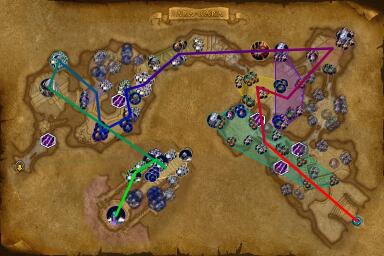
This is a PUG-friendly route suitable for players at a variety of keystone levels, but feel free to make some tweaks once you're ready to start practicing skips or bigger pulls! Links to video guides on the bosses are included within the pull descriptions/notes. Learn more at raider.io/weekly-routes.
100%

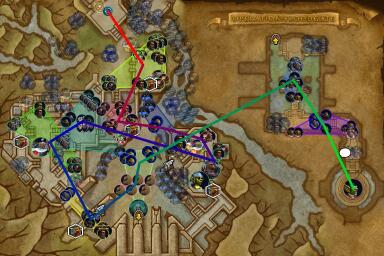
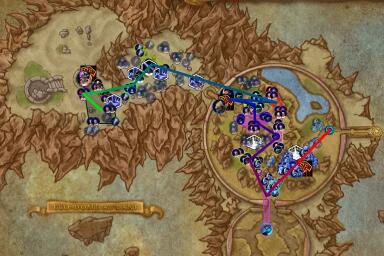
This is a PUG-friendly route that helps you learn some of the pulls you'll encounter as you climb up to higher keys without anything being overly complex. As always, please feel free to pull however you like, but these are pretty much all the mobs you'll play in a higher key with a few very small exceptions. Links to video guides on the bosses are included within the pull descriptions/notes. Learn more at raider.io/weekly-routes.
100%
This is a PUG-friendly route suitable for players at a variety of keystone levels, but feel free to make some tweaks once you're ready to start practicing skips or bigger pulls! Links to video guides on the bosses are included within the pull descriptions/notes. Learn more at raider.io/weekly-routes.
100%
This is a more advanced route seen in high keys on the S3 Leaderboard. Not recommended for PUGs. Learn more at raider.io/weekly-routes!
100%

This is a PUG-friendly route that's more reminiscent of Season 2, going up the left side towards the first boss. Suitable for players at a variety of keystone levels. Links to video guides on the bosses are included within the pull descriptions/notes. Learn more at raider.io/weekly-routes.
100%
This is a PUG-friendly route suitable for players at a variety of keystone levels, but feel free to make some tweaks once you're ready to start practicing skips or bigger pulls! Links to video guides on the bosses are included within the pull descriptions/notes. Learn more at raider.io/weekly-routes.
101%

This is a PUG-friendly route suitable for players at a variety of keystone levels, but feel free to make some tweaks once you're ready to start practicing skips or bigger pulls! Links to video guides on the bosses are included within the pull descriptions/notes. Learn more at raider.io/weekly-routes.
100%
This is a more advanced route seen in high keys on TWW S3 Leaderboard. Not recommended for PUGs. Learn more at raider.io/weekly-routes!
100%
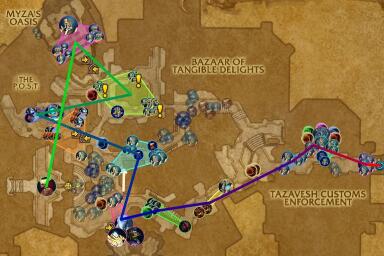
Tried and true. This is a more advanced route seen in high keys, but it's also unironically great for PUGs. Learn more at raider.io/weekly-routes!
100%
This is a more advanced route seen in high keys on TWW S3 Leaderboard. Learn more at raider.io/weekly-routes!
100%
This is a PUG-friendly route suitable for players at a variety of keystone levels. Links to video guides on the bosses are included within the pull descriptions/notes. Learn more at raider.io/weekly-routes.
100%
This is a more advanced route seen in high keys on TWW S3 Leaderboard - particularly the World First +20 Eco-Dome (watch here: https://www.youtube.com/watch?v=pnDYVVVEltQ). Learn more at raider.io/weekly-routes!
101%
This is a more advanced route seen in high keys on TWW S3 PTR Leaderboard. Not recommended for PUGs, and this one really requires voice comms. Learn more at raider.io/weekly-routes!
100%
This is a more advanced route with skips seen in high keys on TWW S3 Leaderboard and echoing what was played in high keys in Season 2. Not recommended for PUGs. Learn more at raider.io/weekly-routes!
100%
This is a route seen in high keys due to the first pull and doing all 4 Stormforged Guardians with the first boss. It's also possible to skip a Burly Deckhand, but not super recommended. Going over count a little in here is worth it for more efficient (but more challenging) pulls. Learn more at raider.io/weekly-routes!
101%
This expert route is done by high key groups such as MDI team Wunderbar. If you are aiming to do keys +15 and up, it's fine to use it in PUGs as long as you communicate beforehand so that people don't bodypull any of the patrols you aim to skip and manage their cooldowns accordingly. Learn more at raider.io/weekly-routes!
100%
 xWolfey
Loading...